
Choosing the right lighting can be challenging, especially for large-scale projects like warehouses, parking lots, or office spaces. Our lighting layout tool integrated with IES files simplifies this process by allowing buyers to visualize and experiment with how different fixtures will perform in real-world conditions. IES files, provided by manufacturers and our in-house test lab, contain essential photometric data such as beam angles, brightness levels, and coverage.
Our commercial account managers use this tool to help customers select the proper fixtures and amount of fixtures to meet their footcandle requirements for the space’s purpose.
For indoor spaces, the tool is used to determine the number of lights needed and to provide guidance on placement and spacing. The process begins by gathering information about the size and intended use of the space. This helps identify the target footcandles, as well as the appropriate fixture type and wattage. From there, the tool calculates the layout, with occasional adjustments made based on the specific setup of the space.
Luxiflux Indoor Lighting Layout Tool
The Luxiflux lighting layout tool helps users simulate and visualize light distribution for indoor spaces. By inputting parameters like room dimensions, ceiling heights, and spacing, users can visualize how to accurately light the space, reducing issues such as dark spots, glare, and unnecessary costs.
The indoor layout tool (Luxiflux Zonal) supports various lighting types, including select high bays, strip lights, panel lights, troffers, vapor-tight, explosion-proof lights, flush mounts, and downlights. Luxifluz Zonal is not available for every product. It is only available on products with an IES file.
Build Customizable Indoor Lighting Layouts
The Luxiflux Zonal Tool is pre-filled with data from the light fixture or luminaire’s IES files, however, you can adjust certain specifications to fit your needs.
The initial footcandle levels are in the system when you open the Luxiflux tool. However, you can change your desired footcandles from the footcandles that are pre-filled. If you adjust the footcandle level, the tool will automatically adjust the number of fixtures and the spacing required to achieve your desired footcandle level.
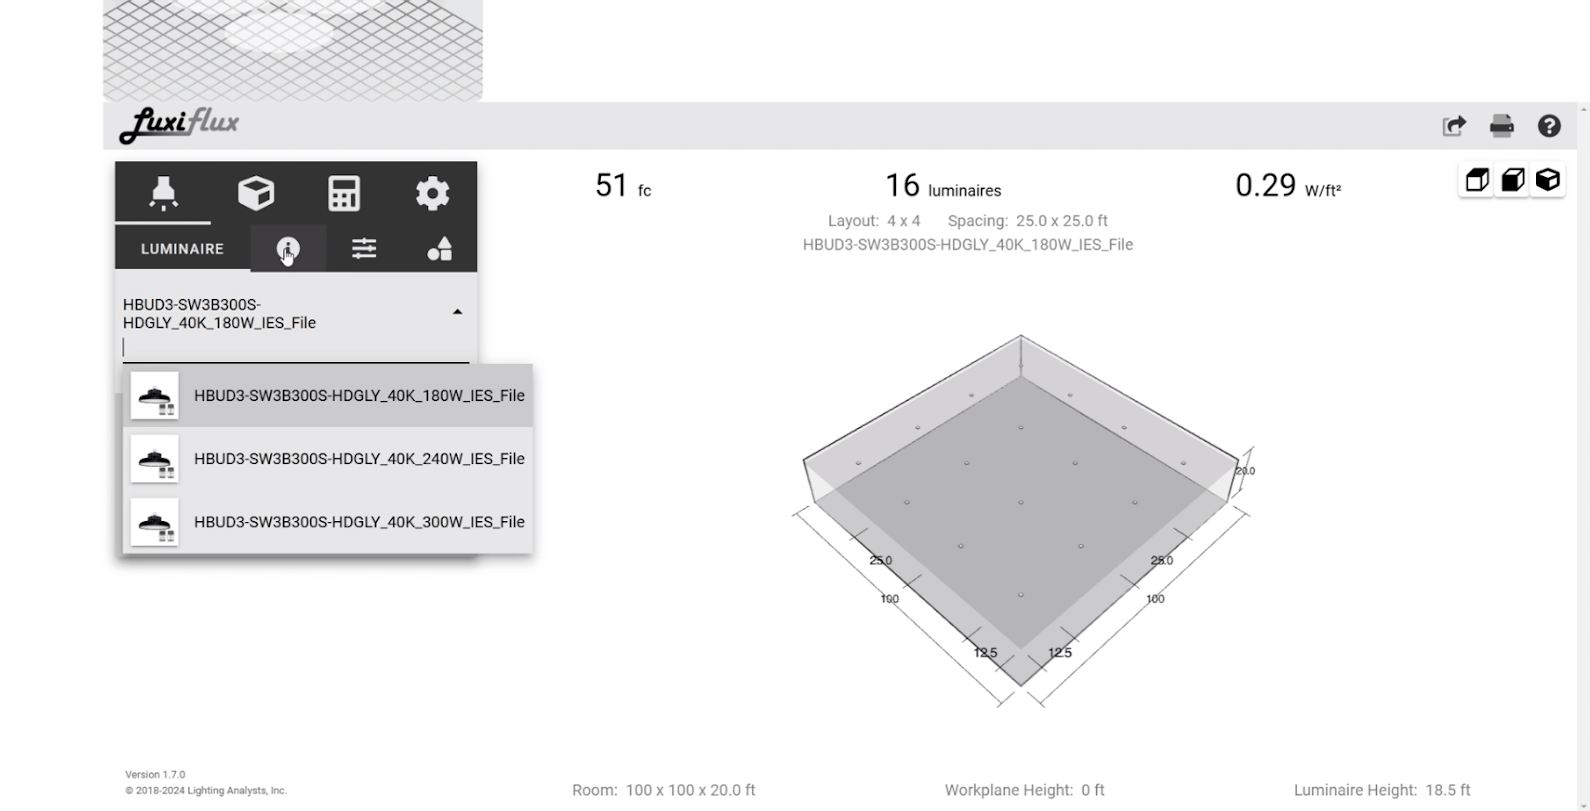
For the following example, we will be using this UFO high bay.
1. Select the Desired Product
Select the desired product’s IES file from the drop-down menu. This high bay is available in multiple wattage options. We will be using the 180W version. Once the IES file for the product is selected, the other luminaire tabs will be populated with the provided information.
Note: If a fixture is available is multiple wattages or has selectable wattage, there will be multiple IES files to choose from. Pick the file that matches the wattage you wish to use.
Tool Icon Key
Luminaire Details
Preloaded information about the light fixture from the IES file. These include the wattage, beam angles, lumens, etc. Don't alter this information, as it is directly pulled from the product's data in the IES file.

Room Size & Reflectance
Adjust the room size, workplane height, suspension length, & reflectance. Changing any of these factors will adjust the amount and spacing of luminaires.

Desired Illuminance and Layout
Set your desired illuminance level, minimum illuminance, and fixture layout. The desired illuminance is the preferred lumen level. You can choose between minimum, maximum, and nearest to see how many fixtures are needed to reach that level.

Settings
Change the units of measurement from the imperial system to the metric system, if desired.
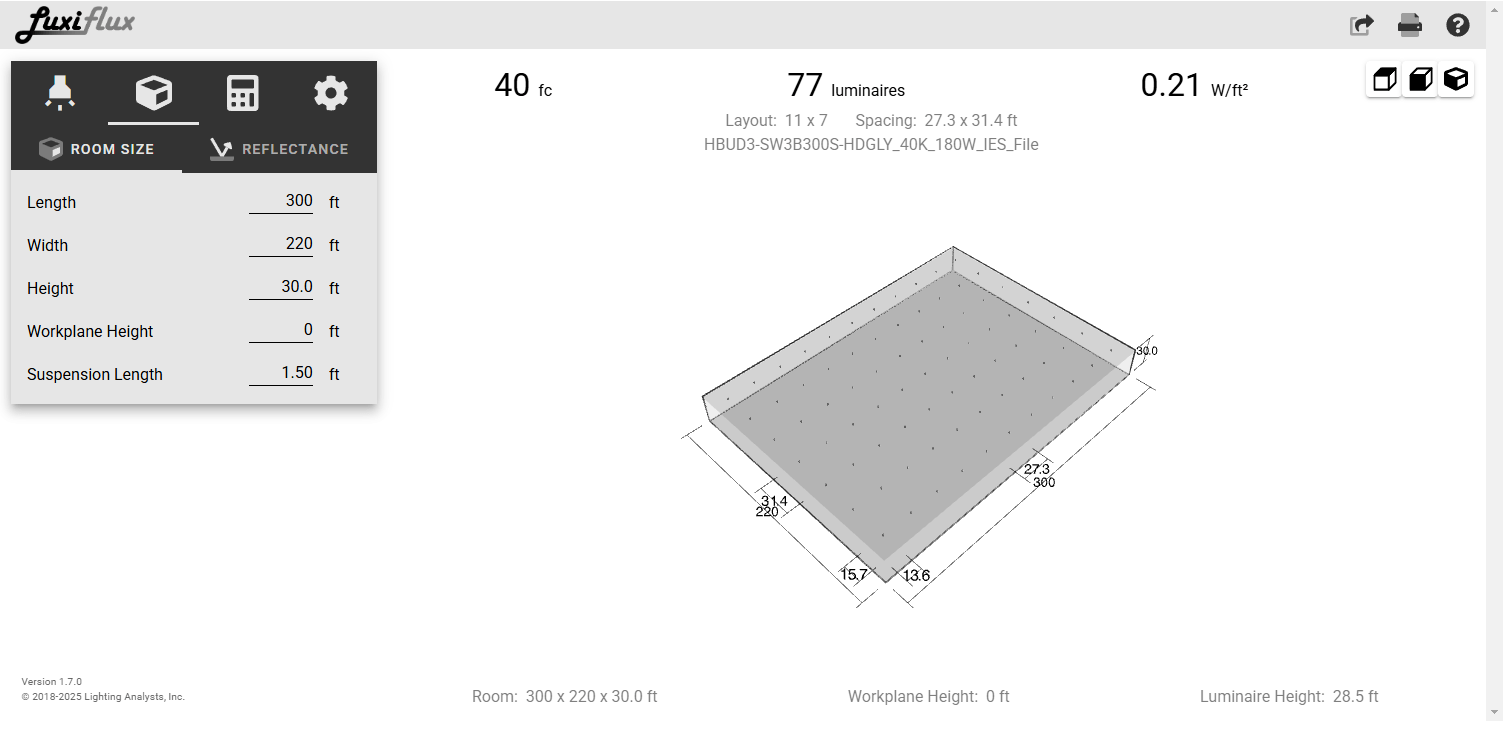
2. Set The Dimensions of the Room
For our example, we’ll make the room’s length 300 feet, width 220 feet, and height 30 feet. The preview on the right will adjust as we enter our values.
Click the Room Size and Reflectance header icon (the cube), click the “Room Size” tab and input:
1. Room dimensions (length, width, height)
2. Workplane height is the vertical distance from the floor to the surface where illuminance is measured.
- 0 ft: Tasks on the floor (warehouses, gym floors, parking garages).
- 2.5 ft: Standard desk height (offices, classrooms, workbenches).
- >2.5 ft: Standing workstations (assembly lines, kitchen counters).
3. Suspension length is the vertical distance from the ceiling to the mounting point of a suspended fixture, typically measured to the top of the fixture housing or body (not the bottom or light-emitting surface).
- Short suspension (~6 inches): Pendant lights in low-ceiling areas, task lighting.
- Standard suspension (12–24 inches): Offices, kitchens, and retail spaces.
- Long suspension (3+ feet): High ceilings, warehouses, and industrial fixtures like high bays
3. Set Your Desired Illuminance/Footcandle Level or Luminaire Amount
Choosing The Desired Footcandle Level
Choose the desired footcandle level. This can be chosen based on your own desired lighting level, IES’s recommended lighting levels, or you can use the desired illuminance populated in the tool for the product. For more information on footcandle levels, read the blog “IES Recommended Lighting Levels for Commercial and Industrial Spaces” from our affiliate, Industrial Commercial Lighting.
In the “Specify” tab, you can input your desired illuminance in footcandles and change the values for luminaires or power density. Changing the number of luminaires and power density alters the inputs that generate the footcandle result.

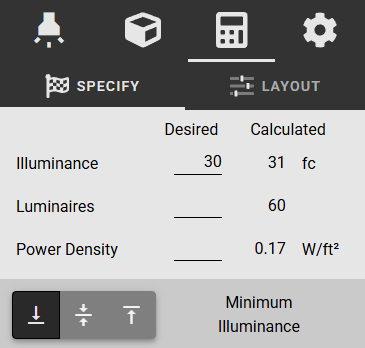
Minimum Illuminance
Minimum Illuminance is the lowest measured light level within the designated area. It represents the darkest point in the lighting layout and is essential for maintaining adequate visibility and minimizing excessive contrast.
When using the minimum illuminance of 30 fc, there are 31 fc with 60 luminaires.
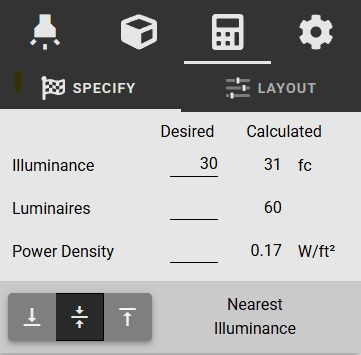
Nearest Illuminance
Nearest Illuminance is the light level measured closest to a specific reference point, such as a work surface, a seating area, or an entryway. This value is used to assess whether the intended area receives sufficient lighting and aligns with recommended standards.
When using the nearest illuminance of 30 fc, there are also 31 fc with 60 luminaires.
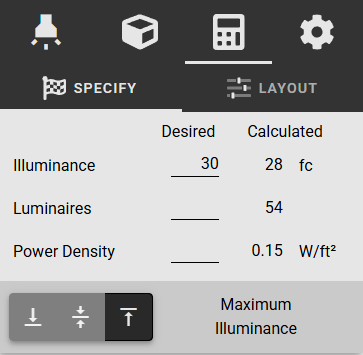
Maximum Illuminance
Maximum Illuminance is the highest measured light level within the space. It indicates the brightest spot in the lighting layout and is important for evaluating potential glare, over-illumination, or inefficiencies in fixture placement.
When using the maximum illuminance of 30 fc, there are 28 fc with 52 luminaires.
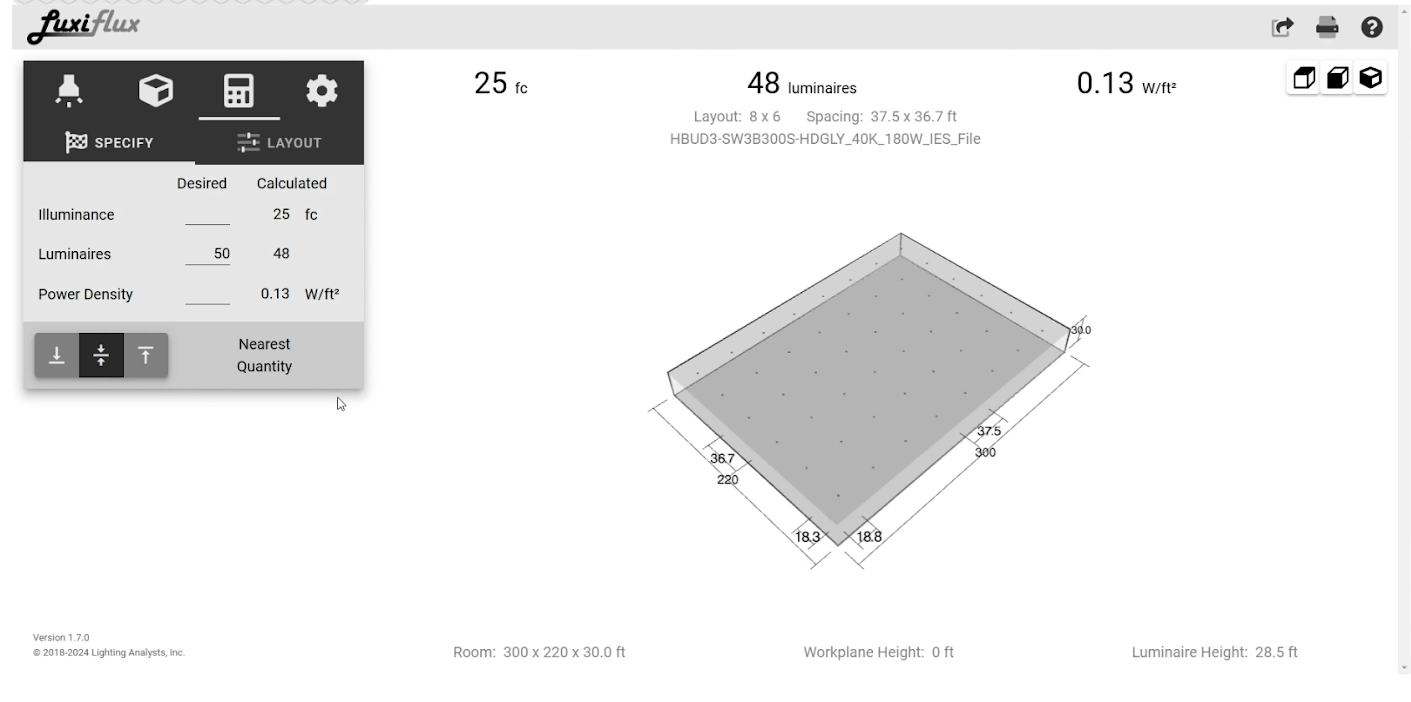
Choosing The Desired Number of Luminaires
You can also alter the lighting layout for a desired number of fixtures and the footcandle level will adjust based on your inputs. For example, if the goal is approximately 50 luminaires, the tool determines that only 48 will fit, resulting in an Illuminance of 25 footcandles.
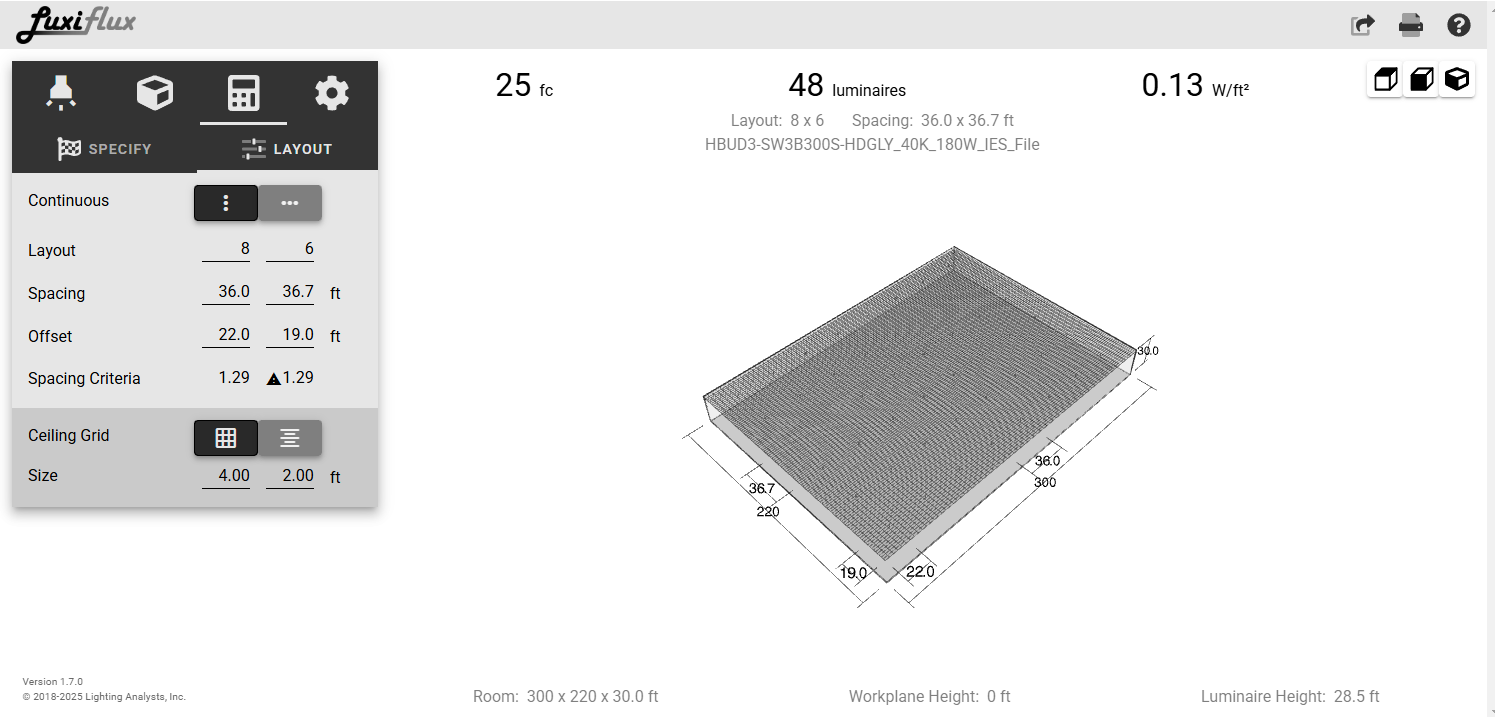
4. Adjust the Layout
Under the Layout tab, the Continuous option arranges lights into a single, uninterrupted set of fixtures. Layout numbers define the number of rows and columns of lights. Spacing determines the distance between lights within the same row and across different rows. Offset sets the starting distance from the walls, which may vary based on shelving or workbench placement.
For ceilings with a grid, you can input the size of the grid or rows to aid in the layout of your space under the “Ceiling Grid” section of the Layout tab.
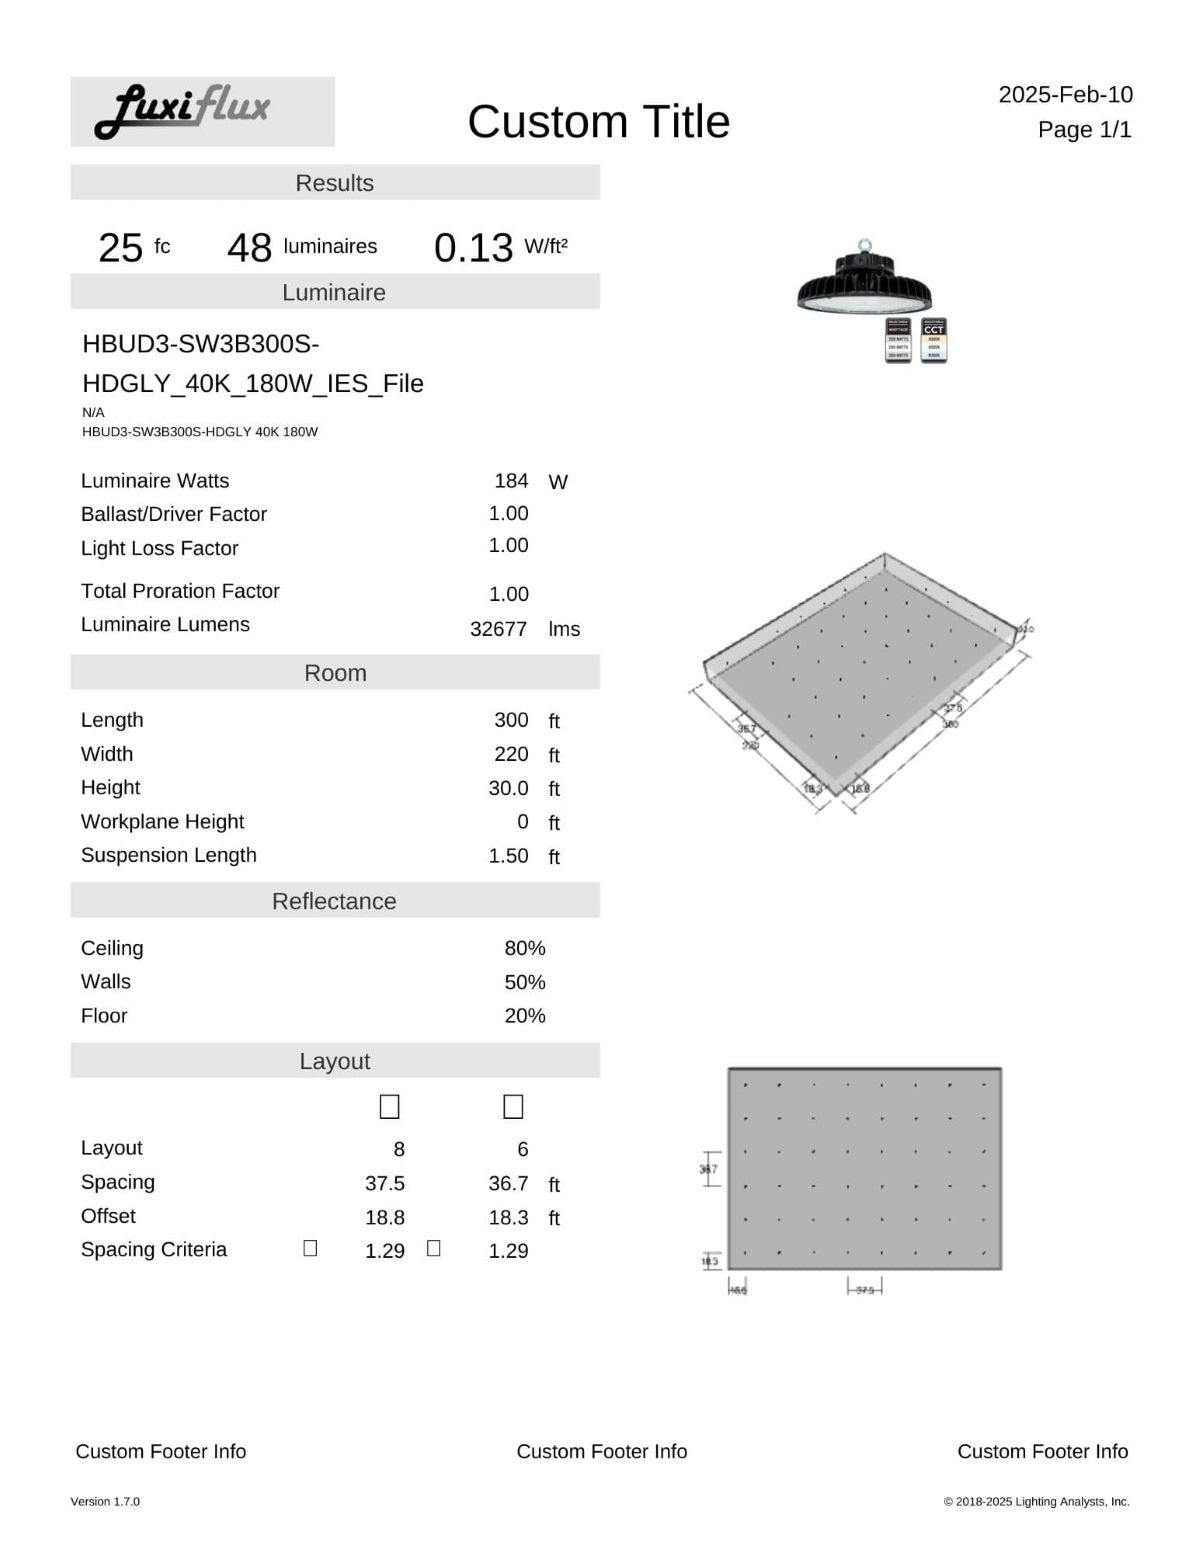
5. Preview and print the lighting layout
Print out or share the specifications and lighting layout design. The header and footer allow you to insert your information, such as your company name, project name, client name, etc. You can also rotate and adjust and rotate the view of the layout in the print preview.
How to Use the Luxiflux Zonal Lighting Layout Tool: Video
Benefits of Using Our Free Lighting Layout Tool
Our free lighting layout tool offers multiple benefits:
-
Accurate Real-World Visualization with IES Files
Integrated with IES files from manufacturers and our in-house test lab, the tool provides essential photometric data—such as beam angles, brightness, and light coverage—allowing users to visualize how fixtures will perform in real-world conditions. This ensures better fixture selection and optimal light distribution. -
Customizable Indoor Layouts for Precise Light Levels
Users can input room dimensions, ceiling heights, and suspension lengths to simulate light distribution and meet specific illuminance requirements. This helps prevent issues like dark spots or glare, ensuring energy-efficient and high-performance lighting designs. -
Grid and Placement Tools for Indoor Layouts
The tool features grid and placement options that enable precise indoor lighting design. Allowing users to position fixtures accurately within a space, it helps achieve even light distribution, minimize shadows, and ensure compliance with industry lighting standards. -
Cost-Effective Lighting Plans to Avoid Overbuying or Underlighting
The tool eliminates guesswork and helps buyers select the appropriate number of fixtures for their space, reducing unnecessary costs. Whether designing lighting for warehouses or commercial interiors, it ensures an efficient and streamlined decision-making process.
by Lauren Scott
LED Lighting Specialist
Lauren's been with Super Bright LEDs for over two years, gaining the training and knowledge to provide technically accurate content to consumers. She enjoys writing about commercial and vehicle lighting.
When she's not writing about LEDs, Lauren enjoys watching horror movies, going to concerts, and spending time with loved ones.
Get In Touch Email Us | 866-590-3533 | Live Chat
