
If you want to install your new off-road LED light bar but aren’t sure how, we will walk you through the process with several instructions. These instructions include installation options with or without a wire harness and connecting to existing LED lights. The exact steps for installation vary based on the type of vehicle, existing lighting setup, and chosen wiring method.
At the end of the blog, we answer frequently asked questions about off-road light bars and installation.
General Recommendations
The steps below are the same for all off-road light bar installations.
-
Bench test everything prior to installation.
-
Don't over-tighten the hardware.
-
Keep all lights and wires away from moving parts, high heat sources, brake components, exhaust components, and coolant systems.
-
Before drilling holes, check behind the locations to ensure you won't damage anything.
-
Secure wiring to avoid damage.
-
Following the vehicle manufacturer's wiring harness is a safe path.
-
Fuse all connections within 18" of the battery/power source.
-
After each installation, double-check proper aiming to yield the best results, and tighten all mounting hardware.
-
Optional remote-controlled switches (RCS-RF25A) speed up the installation time and avoid routing wires through the firewall.
Installation With Super Bright LEDs Harness

(DT) WH-DTS10, WH-DTD15, WWH-DTD30; (ATP) WH-ATPS22, WH-ATPD20, WWHP-ATPS20
Wiring steps must be completed for each mode for any Selectable Multibeam and Dual Color light bars.
-
Find a suitable location to run wires and mount the LED lights. Mark where you want to position the mounting holes and drill appropriate-sized holes. Mount the lights with the provided hardware. Optional mounting brackets (MODLED-BK, BARBRKT-0.75, BARBRKT-1), clamps (MODCLx-BK), and magnetic mounting systems (WL-MB) are available.
-
Route the lighting side of the wiring harness from the battery to the light and connect the harness to the light. Prolonged chafing of the wires may cause a short circuit. If lights don’t come with DT or DTP/ATP connections, you can add them from the harness kit or purchase them separately (DT-FPT or ATP-FPT).
-
Continue to route the switch portion of the harness to the desired location. Unplug the switch from the harness to make routing easier.
-
Drill an appropriate-sized hole for the switch. Connect the wires to the switch and mount. Illuminated rectangular rocker switches (RS-x) are available with different legends.
-
Connect the black (ground) wire with the large ring terminal from the harness to the negative battery terminal, and connect the red (power) wire with the large ring terminal from the harness to the positive battery terminal.
-
Secure the relay and test the lights to ensure the circuit works.
Installation With Existing Wiring

-
Disconnect your existing lighting circuit from the battery or remove the existing fuse. Find a mounting location that allows running wires. Mark where your holes will be for the light bar brackets or mounting feet, and drill the holes.
-
Mount the lights with the provided hardware or with optional mounting brackets. Optional mounting brackets (MODLED-BK, BARBRKT-0.75, BARBRKT-1), clamps (MODCLx-BK), and magnetic mounting systems (WL-MB) are available.
-
Connect the black ground wire of the new light to the ground wire of the old light with solder and heat shrink tubing (DWS-x) or perma-seal butt connectors (PSC-x). Connect the red power wire of the new light to the power wire of the old light.
-
Utilize the ATP or DT connects with the corresponding ATP (ATP-MPT) or DT (DT-MPT) pigtails if you choose.
Installation With Wiring Pigtail and Without a Harness.
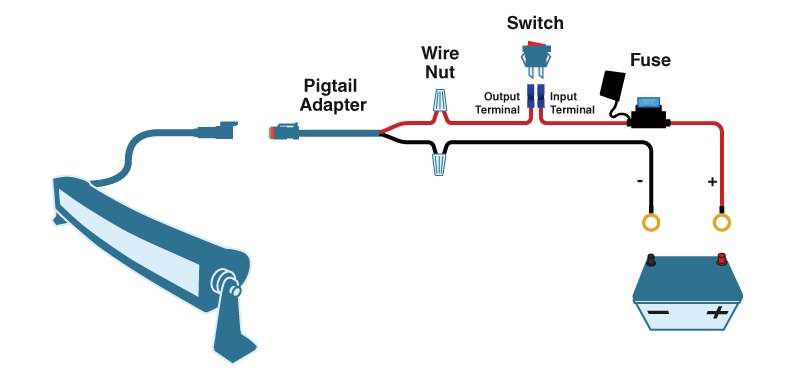
-
Find a mounting location for running wires and mounting the LED light bar. Lay out and mark where you'll mount the lights and drill the holes. Mount the lights with the provided hardware. Optional mounting brackets (MODLED-BK), clamps (MODCLx-BK), and magnetic mounting systems (WL-MB) are available.
-
Route the wiring from the battery to the light safely and securely. Purchase two separate runs of two-conductor wire or cut a longer run. Connect the negative wire from the battery to the black wire of the pigtail (DT-MPT or ATP-MPT). Connect the positive wire to the switch's input terminal (RS-x, RRS-SPx, or WRRS-SPR). Then, connect the switch's output terminal to the pigtail's red wire.
-
Double-check for all obstructions and proper clearance. Drill an appropriate-sized hole for the switch and mount it.
-
Connect your black wire to the negative battery terminal. Then connect the other terminal of the switch to the positive battery terminal with an appropriately sized fuse holder (WMFH) and fuse (MAF-x) installed within 18 inches of the battery. Cut your section of red wire and install the fuse holder between the switch and the battery. Connect your other run of red wire to the switch output terminal.
Frequently Asked Questions
Why Should I Choose a Super Bright LEDs’ Light Bar?
Our fully equipped in-house test lab uses the latest equipment for photometric/electrical testing, long-term lumen maintenance testing, and stress testing for environmental conditions to ensure our customers receive the highest quality products.
Products carrying a Lifetime Warranty will be free from defects in the material and workmanship for the product's lifetime. If an LED or other internal component fails, return the product to Super Bright LEDs, Inc. After inspection, Super Bright LEDs will replace the product if we verify the defect isn't a result of negligence, abuse, unauthorized repair, or disassembly. If the exact product is unavailable, an equal-value product might be substitutable.
Do I Need a Wiring Harness?
We recommend purchasing a wiring harness if your vehicle doesn't have a relay-controlled light. An experienced technician can create and install a custom wiring system, but a harness offers many benefits that a wiring system may not:
-
The harness, fitted with a relay, ensures proper load switching for our light bars and work lights. The relay is replaceable and takes the current load instead of feeding the full current to the dash switch.
-
It has an in-line fuse holder that protects the vehicle's circuits.
-
Harnesses come with direct connectors matching our light bars, negating pigtail needs and weatherproofing the connections.
-
Features low-current switches to reduce the footprint on the vehicle's dash.
-
The gauge of wire needed for a low-current switch allows for easier routing. The switch wiring has a disconnect to make installation easy.
What is the difference between DTP/ATP and DT connectors?
DTP/ATP connectors handle larger current draws. DT connectors are better for lower current-draw light bars and work lights.
Can I run a light bar from a wall outlet?
No. Our bars are designed for low-voltage DC systems and require the proper voltage and current levels to operate correctly. Connecting the lights to any other power source may not work and will void the warranty. We do not recommend stationary setups because the high-power design of the LED requires airflow across the heat sink to dissipate heat properly.
Can I dim this lightbar?
No. These light bars operate in a wide voltage range but cannot dim. Attempting to dim them could damage the driver and void the warranty.
What is the difference between Multi-Beam and Combo Beam? Do I need a spot beam or flood beam for my application?
Flood

Combo

Spot

Selectable Multi

by Super Bright LEDs Experts
The Super Bright LEDs editorial team provides expert guidance on LED lighting solutions for commercial, industrial, vehicle, and residential use. Their trusted insights help businesses and homeowners make informed lighting decisions.
Get In Touch Email Us | 866-590-3533 | Live Chat


